
|
|
|
|
|
|
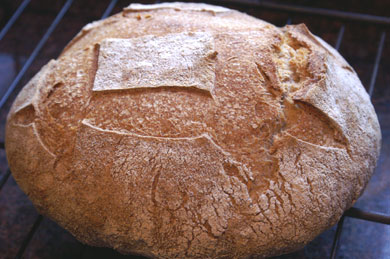
| Peasant Bread |


|
|
Although I got distracted (fortunately, it turns out) along the way, Best-selling author William Alexander started out be
about a simple quest: to bake the perfect loaf of peasant bread, or as the French call it,
pain de campagne, or "country bread." The peasant bread I envisioned was a rustic loaf, not too fussy, made from
just four ingredients (flour, water, yeast, and salt), a large, open crumb with a real wheat flavor,
a crisp but chewy crust, and a natural sweetness from the fermentation.
This recipe is a close as I came. On good days it's sublime; but even on bad days, it's most likely
better than anything you can buy.
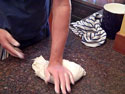
Like all my breads, it utilizes a wild yeast starter and a resting period ("autolyse") followed by just 7 minutes of hand
kneading. I always measure by weight, which is far more accurate and reproducible than measuring by volume.
You can purchase an accurate scale for under $30.
|
|
Ingredients
400 grams unbleached all-purpose or bread flour
260 grams levain (see Building a Levain)
60 grams whole wheat flour
30 grams whole rye flour
13 grams salt
292 grams water (room temp)
1/8 teaspoon instant yeast (also called bread machine, fast-acting, or Rapid-Rise yeast)
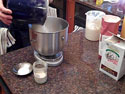
Prepare the dough
- At least 2 hours before beginning (you can do this the night before), feed levain as follows: Remove levain from refrigerator and add equal parts flour and room-temperature water (I use about 130 g each, which replenishes what I'll be using in the bread). Stir/whip well, incorporating oxygen, and leave on the countertop, with the cover slightly ajar. Starter should be bubbling and lively when you begin your bread.
- Place a large bowl on your scale and zero out the scale. Now add the flours, one at a time, zeroing out the scale after each addition. Separately weigh and add the salt. Add the levain, a dash of instant yeast, and the water.
- Mix thoroughly with a wet hand until the dough is homogeneous. Mist a piece of plastic wrap with vegetable oil spray, press it directly onto the dough, and leave the dough to autolyse for 20-25 minutes.
Kneading and fermentation
- Knead by hand 7-9 minutes (see my kneading video if you've never kneaded before). If you insist, you can use a stand mixer with a dough hook for 2-3 minutes. Knead until dough is elastic and smooth.
- Clean out and dry the mixing bowl (no soap), mist with vegetable oil spray, and replace the dough. Place the oiled plastic wrap back onto the dough. Ferment at room temperature (68 -72 degrees is ideal) for 4 to 5 hours.
Form and proof the boule
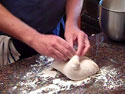
- Using your hand or a flexible pastry scraper, remove the dough to a floured countertop.
- Gently press down to form a disk about an inch thick. Try not to press out the gas bubbles or fuss with it too much.
- Fold the edges into the center. Move around the disk several times, pulling and gathering, tighter and tighter, trying to create some surface tension, as you form a ball. Finish with a just few seconds of half-rolling, half-dragging across the floured countertop, moving the boule in a tight circular motion.
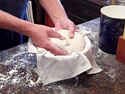
- If you don't have a banneton or basket for proofing boules, simply line a kitchen colander with a well-floured linen napkin and place the boule inside, seam side up.
- Cover with same piece of plastic wrap and set aside to proof, 1½ to 2 hours. While dough is proofing, place a baking stone in lower third of oven, and an old cast iron skillet or pan on the bottom shelf. Preheat oven to its highest setting.
Score and bake
- After 1½ to 2 hours, when the dough is proofed (another term for the second rise), it should have increased in volume by about half, and feel slightly springy.
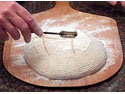
Transfer each loaf to a peel that is liberally sprinkled with rice flour or corn meal (or covered with a piece of parchment paper, but note that the paper will burn if you preheat the oven to 550°F). Sprinkle the top of the loaf with rye or rice flour if you want that country "dusted" look.
- Make several symmetrical slashes (or grignes) with your lame or razor. A "tic-tac-toe" grid is a good way for beginners to start.
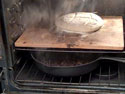
- Immediately slide loaf (including paper, if using parchment) onto stone and, wearing an oven mitt, add 1 cup water to skillet. Try to minimize the time the oven door is open.
- Set oven temperature to 480°F.
- After 20-25 minutes, or when loaves have turned dark brown, reduce oven temperature to 425°F.
- Bake until loaves register 210°F in center, about 50 to 60 minutes) with an instant-read thermometer, or until a rap on the bottom of the loaf produces a hollow, drum-like sound.
- Return bread to oven, with oven off and door closed, for 10 to 15 minutes.
- Remove bread to a rack and cool for at least 2 hours before serving.
|
|
|